
Sildurs Vibrant Shaders for Minecraft [Latest 2023]
Last Updated on: 4th June 2024, 12:41 pm
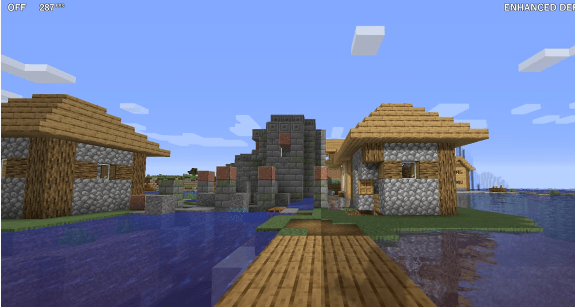
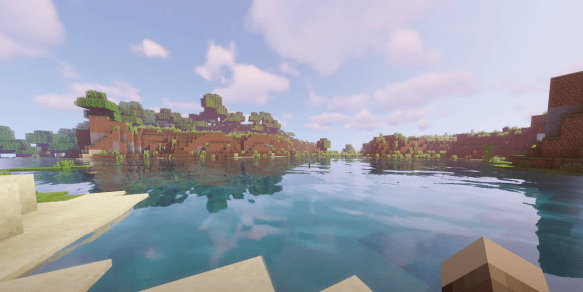
Have you heard of Sildur’s Vibrant Shaders? It’s an amazing addition to Minecraft that enhances the game’s visuals in so many ways! Created by SildurFX, these shaders add stunning effects like realistic lighting, shadows, and reflections. With Sildur’s Vibrant Shaders, you can experience sunlight that looks just like the real thing and water that’s more lifelike than ever before.
It’s no wonder that so many players love this project – it makes Minecraft look even more awesome while ensuring that the game runs smoothly. If you haven’t tried Sildur’s Vibrant Shaders yet, you’re missing out on a truly amazing Minecraft experience. Give it a go and see how it brings an exciting new dimension to your Minecraft world!
Features and Customizations
Sildur’s Vibrant Shaders act like a magic tool for your Minecraft world. They add really cool effects that transform your game into a fantastic visual place. Here’s what they do:
- Volumetric Lighting: This fancy term means that sunlight, moonlight, and other light sources create realistic rays that make the game world feel alive. It’s like you can almost touch the light.
- Bloom: This adds a soft glow to bright areas, making the game feel dreamy and immersive. It’s like a natural Instagram filter for Minecraft.
- Ambient Occlusion: This one’s tricky to say but easy to understand. It adds shadows to corners and edges, making things look more realistic and less flat.
- Reflections: Water, glass, and shiny surfaces reflect what’s around them. It’s like having a mirror in your game.
These features make your Minecraft world look stunning as if you’re discovering a new place. The best thing? You can pick presets that match your computer’s capability:
- Lite: For smoother performance on lower-end computers.
- Medium: A balance between good looks and performance.
- High: Stunning visuals for those with powerful computers.
You see, these shaders let you customize your game to match your computer’s strength. So, no matter if your computer is super powerful or a bit old, there’s a setting that’s just right for you.
Sildur’s Vibrant Shaders make Minecraft more than a game. It becomes an exciting visual adventure. You can use these shaders when building, exploring, or simply relaxing. They create magical moments. Let’s learn how to get these effects on your screen.
Compatibility and Performance
Wondering if your computer can handle these fancy changes? Well, here’s the good news: Sildur’s Vibrant Shaders are flexible – they work on different computers. Here’s how:
Compatibility for Everyone: These shaders get along with all kinds of systems, even Macs and computers with Intel graphics cards. You don’t need a supercomputer to enjoy the cool visuals.
Smooth Performance: The best part? Sildur’s Vibrant Shaders give you stunning effects without slowing down your game. It’s like having a fast car that doesn’t use too much fuel. You get both speed and style.
Adjusting Effects: If you worry about performance, no problem. You can turn off some effects that might be too much for your computer. It’s like changing settings on your phone to save battery. So, if you want a super smooth game, you can change things without losing the coolness.
Sildurs Vibrant Shaders Minimum Requirements
The minimum graphics card for Sildurs Vibrant Shaders is a PC with an i7-8700 processor and 16GB of RAM is the GTX 1050 Ti.

How to Install Sildurs Vibrant Shaders?
Alright, time to get those awesome shaders onto your Minecraft world. Don’t worry, it’s not as tricky as you might think. There are two ways to do it:
Method 1: Using Iris and Sodium (Fabric Mod)
- Prepare Minecraft: If you haven’t already, download and install Minecraft from the official website.
- Get Iris: Download the Iris jar file from the Iris website.
- Set Up a Profile: Create a game profile for the version of Minecraft you want to play with shaders.
- Run Iris: Open the Iris jar file you downloaded. A window will pop up.
- Choose Installation Type: In the Iris installer, select “Iris and Sodium” – this is important for the shaders to work smoothly.
- Select Shader Pack: After installation, open Minecraft and go to the in-game options. Find the shaders section and choose Sildur’s Vibrant Shaders.
Method 2: Using Optifine
- Prepare Minecraft: Download and install Minecraft from the official website.
- Get Optifine: Download the Optifine jar file from the Optifine website.
- Install Optifine: Run the Optifine jar file to install Optifine. This will create a new Optifine profile in your Minecraft launcher.
- Choose Shader Pack: Open Minecraft with the Optifine profile. Go to the in-game options, find the shaders section, and select Sildur’s Vibrant Shaders.
See, it’s not as complicated as it sounds. Whether you’re using Iris or Optifine, these steps will get those gorgeous shaders up and running in no time. It’s like adding a whole new layer of magic to your Minecraft adventure.
So, let’s move on and discover more about the different versions of Sildur’s Vibrant Shaders and how you can customize them to match your style.
Shaders Links
Vibrant Shaders
Sildurs Vibrant Shaders Not Showing Up
The shader option is not available in other versions of Minecraft, which may be due to the limitations of OpenGL 2.1 or because the shaders have been disabled on Minecraft for performance reasons. Some people believe that Minecraft does not have shaders because of problems with the file system.
Support and Official Resources
You’re excited about trying out Sildur’s Vibrant Shaders, and guess what? There’s a bunch of resources out there to help you get the most out of them.
- Official Website: This is like the headquarters for all things Sildur’s Vibrant Shaders. You can find tons of information, download links, and updates on the official website: https://sildurs-shaders.github.io/. It’s like having a treasure map to all the shader goodness.
- Patreon Support: You know how some people have those “Buy Me a Coffee” links? Well, the creators of Sildur’s Vibrant Shaders have something similar on Patreon. You can show your support by becoming a patron: https://www.patreon.com/Sildur. It’s like giving a thumbs-up to the wizards behind these shaders.
- Updates and Changelogs: Just like how your favorite apps get updated, Sildur’s Vibrant Shaders also get better over time. You can find the latest changes and updates on the official website. It’s like getting a shiny new toy every now and then.
- Community and Feedback: You’re not alone on this journey. There’s a whole community of players who love these shaders just like you. You can leave comments, ask questions, and share your experiences with others who are just as amazed by the visuals. It’s like joining a secret club of gamers who speak the same language.
Remember, all these resources are your tools for getting the most out of Sildur’s Vibrant Shaders. Use them to stay updated, connect with creators, and chat with fellow gamers. These resources are here to help you.
Conclusion: Sildrus Vibrant Shaders
So that folks, this was all you need to about the game, we carefully researched to provide you the useful and accurate instructions on How to install Sildurs Vibrant Shaders we hope this blog post helps you to get started and enjoy the game. Sildurs vibrant shaders are a great addition to any graphics arsenal.
They can add an extra level of realism and vibrancy to your game, making it that much more immersive and enjoyable for the player. So if you’re looking for a way to give your game an edge, or just want to make things a bit more exciting, consider using these shaders.
FAQ-Frequently Asked Question
Is Sildurs a vivid shader?
How can you modify Sildurs lively Shaders?
Does it support Sildurs shaders suitable for a low-end PCs?
The shaders in Sildur’s version of Minecraft are created so that they have a range of choices in terms of levels and shaders available for gamers to choose from. If you own low-end hardware it is possible to make use of a lighter variant of these shaders instead of using the Medium or High versions.


![Best Cool Discord PFP [2023] | Top Discord PFP That Stands Out](https://blocles4u.com/wp-content/uploads/2022/02/cool-discord-pfp-768x374.jpg)
![Install Roblox Shaders | Step by Step Guide [2023]](https://blocles4u.com/wp-content/uploads/2021/08/roblox-shaders.png)
![Ultimate List Of Sports Games On Nintendo Switch [10 Best]](https://blocles4u.com/wp-content/uploads/2022/07/1-Unboxing-My-Nintendo-Switch-OLED-DREAM-😍-YouTube.png)
![Animal Jam Codes | Latest [2023 Codes]](https://blocles4u.com/wp-content/uploads/2021/08/animal-jam-codes-2021.png)