Activate Samsung Do Not Disturb: A Step-by-Step Guide
Last Updated on: 22nd November 2023, 02:07 pm
If you’re looking for a way to have some uninterrupted time with your Samsung Galaxy Devices, the “samsung do not disturb” feature is your solution. It’s designed to keep calls and notifications at bay, allowing you to focus on what matters most to you.
Whether it’s for work, leisure, or a good night’s sleep, this feature has got you covered. No need to worry about missing important calls – you can even set exceptions for specific contacts. In this article, we’ll walk you through how to set it up and customize it to suit your needs. Say goodbye to unnecessary interruptions with this handy feature!
How To Activate “Samsung Do Not Disturb”

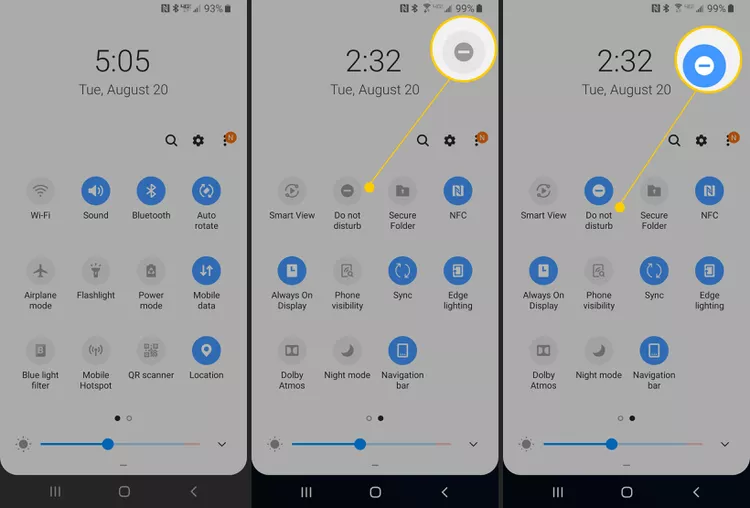
Activating “Do Not Disturb” on your Samsung Galaxy devices is a straightforward process. Just follow these simple steps:
- Swipe Down for Quick Settings:
- Begin by swiping down twice from the top of your screen. This will open the Quick Settings menu.
- Tap the Settings Icon:
- Look for the settings icon (usually a gear-shaped symbol) and tap on it.
- Navigate to Notifications:
- Within the settings menu, locate and tap on “Notifications“.
- Access “Do Not Disturb”:
- Inside the Notifications menu, you’ll find “Do not disturb“. Tap on it to access the feature.

- Toggle to Activate:
- Once you’re in the “Do Not Disturb” settings, you’ll see an on/off toggle switch. Tap it to turn on “Do Not Disturb“.
This simple series of steps ensures that your Samsung Galaxy is set to block out calls and notifications, allowing you to focus on your tasks or enjoy some uninterrupted peace.
When you’re ready to revert back to normal, just follow these steps again and toggle the switch to turn off “Do Not Disturb”. It’s a quick and effective way to take control of your phone’s interruptions.
Customizing “Do Not Disturb” Duration
Tailoring the duration of “Do Not Disturb” on your Samsung Galaxy devices is easy. Follow these steps to set it to your preferred timeframe:
- Access “For How Long?”:
- Within the “Do Not Disturb” settings, you’ll find an option labeled “For how long?“. Tap on it.
- Choose Your Desired Duration:
- A menu will pop up with various duration options, such as 30 minutes, 1 hour, or custom settings. Select the one that suits your needs.
- Confirm Your Choice:
- After selecting the duration, tap “OK” to confirm. This locks in your chosen timeframe.
With this feature, you have the flexibility to decide how long you want to remain undisturbed. Whether it’s for a short meeting or a longer period of focused work, customizing the duration is a useful way to make “Samsung Do Not Disturb” work for you.
Remember, if you ever want to adjust the duration, simply revisit these steps. It’s a simple yet effective tool to enhance your productivity and keep disruptions at bay.
Setting Automatic Activation
You can automate the activation of “Do Not Disturb” on your Samsung Galaxy devices using the scheduling feature. Here’s how:
- Tap “Add Schedule”:
- Within the “Do Not Disturb” settings, locate and tap “Add schedule”.
- Follow on-screen Instructions:
- You’ll be guided through a series of on-screen instructions to select the desired settings. This includes choosing the days and times when you want “Do Not Disturb” to activate.
- Ensure Scheduled Times are Set:
- Once you’ve followed the prompts and set your preferred schedule, make sure to review and confirm the selected days and times.
By using this feature, your phone will automatically enter “Do Not Disturb” mode according to the schedule you’ve set. This can be especially useful for ensuring uninterrupted sleep or focused work periods.
If you ever need to make changes to the schedule, just revisit these steps. It’s a handy tool for maintaining a controlled and distraction-free environment on your device.
Selecting Contacts for Exceptions
With “Samsung Do Not Disturb” active, you can still allow specific contacts to reach you. Follow these steps to set up exceptions on your Samsung Galaxy devices:
- Tap “Calls and Messages”:
- Inside the “Do Not Disturb” settings, find and tap “Calls and messages”.
- Follow the on-screen Instructions:
- You’ll be guided through a simple process to select the contacts you want to allow through “Do Not Disturb”.
- Confirm Selected Contacts:
- After choosing your desired contacts, make sure to confirm your selections.
By setting exceptions, you ensure that important calls and messages will come through even when “Do Not Disturb” is active. This is especially useful for emergencies or for allowing specific people to reach you during focused work times.
Remember, you can always revisit these steps to adjust your selected contacts as needed. This feature gives you control over who can reach you, even when you’re in quiet mode.
Conclusion: Samsung Do Not Disturb
To sum up, knowing how to use the “Do Not Disturb” option on your Samsung Galaxy devices gives you power over interruptions. This is useful for work, sleep, or leisure time. You can easily turn on, adjust, and control this feature by following these simple steps.
Don’t forget, you can make special rules for certain contacts and apps so you don’t miss important things. With these tips, you can make the most of this helpful feature, which will make your digital experience more productive and peaceful.


![SoPlayer IPTV [2023] | Quickly Install & Set Up](https://blocles4u.com/wp-content/uploads/2022/03/soplayer-iptv.png)

![Stream Twitch On Firestick [2023] | 3 Easy Steps](https://blocles4u.com/wp-content/uploads/2022/03/drl-cwqd6tm-768x512.jpg)
![How to Watch Twitch on Roku: The [Ultimate Guide of 2023]](https://blocles4u.com/wp-content/uploads/2021/08/twitch-on-roku-2022.png)
